How to Create a Cart Drawer/Slide Cart Manually in Shopify Without Shopify Apps

In the world of e-commerce, the user experience can make or break a sale. One critical aspect of this experience is the shopping cart. While there are numerous Shopify apps available for creating a cart drawer, some store owners prefer to have more control over the customization process. If you’re one of those Shopify store owners who want to create a cart drawer manually, this article is for you.
In this guide, we will walk you through the process of designing and implementing a cart drawer, also known as a slide cart, without relying on third-party Shopify apps. By taking control of this crucial element, you can tailor it to your brand’s unique style and customer preferences. So, let’s dive in and learn how to create a cart drawer manually in Shopify to enhance the shopping experience for your customers.
Here’s how you can do it:
- From your Shopify admin, go to Online Store > Themes.
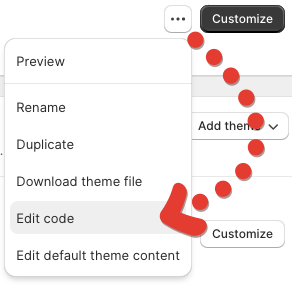
- Find the theme you want to edit, and then click … > Edit code.
- Go to the Assets folder and create two files:
hura-cart-drawer.cssandhura-cart-drawer.js. Once you have created the two files, open them and apply the following codes:
hura-cart-drawer.css
For the styles of the cart drawer, copy the following code:
1 2 3 4 5 6 7 8 9 10 11 12 13 14 15 16 17 18 19 20 21 22 23 24 25 26 27 28 29 30 31 32 33 34 35 36 37 38 39 40 41 42 43 44 45 46 47 48 49 50 51 52 53 54 55 56 57 58 59 60 61 62 63 64 65 66 67 68 69 70 71 72 73 74 75 76 77 78 79 80 81 82 83 84 85 86 87 88 89 90 91 92 93 94 95 96 97 98 99 100 101 102 103 104 105 106 107 108 109 110 111 112 113 114 115 116 117 118 119 120 121 122 123 124 125 126 127 128 129 130 131 132 133 134 135 136 137 138 139 140 141 142 143 144 145 146 147 148 149 150 151 152 153 154 155 | .drawer { display: none; } .drawer__header { padding: 1.5rem; display: flex; justify-content: space-between; align-items: center; border-bottom: 1px solid #ddd; } .drawer__close { margin: 0; padding: 0; border: none; background-color: transparent; cursor: pointer; background-image: url("data:image/svg+xml,%0A%3Csvg width='15px' height='16px' viewBox='0 0 15 16' version='1.1' xmlns='http://www.w3.org/2000/svg' xmlns:xlink='http://www.w3.org/1999/xlink'%3E%3Cg id='Page-1' stroke='none' stroke-width='1' fill='none' fill-rule='evenodd'%3E%3Cg id='2.-Menu' transform='translate(-15.000000, -13.000000)' stroke='%23000000'%3E%3Cg id='Group' transform='translate(15.000000, 13.521000)'%3E%3Cpath d='M0,0.479000129 L15,14.2971819' id='Path-3'%3E%3C/path%3E%3Cpath d='M0,14.7761821 L15,-1.24344979e-14' id='Path-3'%3E%3C/path%3E%3C/g%3E%3C/g%3E%3C/g%3E%3C/svg%3E"); width: 15px; height: 15px; } .drawer__wrapper { position: fixed; top: 0; right: 0; bottom: 0; height: 100%; width: 100%; max-width: 500px; z-index: 9999; overflow: auto; transition: transform 0.3s; will-change: transform; background-color: #fff; display: flex; flex-direction: column; -webkit-transform: translateX(103%); transform: translateX(103%); -webkit-overflow-scrolling: touch; box-shadow: 0 2px 6px #777; } .drawer__content { position: relative; overflow-x: hidden; overflow-y: auto; height: 100%; flex-grow: 1; padding: 1.5rem; } .drawer.is-active { display: block; } .drawer.is-visible .drawer__wrapper { -webkit-transform: translateX(0); transform: translateX(0); } .drawer.is-visible .drawer__overlay { opacity: 0.5; } .drawer__overlay { position: fixed; top: 0; right: 0; bottom: 0; left: 0; width: 100%; z-index: 200; opacity: 0; transition: opacity 0.3s; will-change: opacity; background-color: #000; -webkit-user-select: none; -moz-user-select: none; -ms-user-select: none; user-select: none; } .hura-cart-drawer-remove-item { margin-top: 5px; padding: 0; display: block; font-size: 90%; text-decoration: underline; color: #ff0000; } .hura-cart-drawer-item { border-bottom: 1px solid #c6c6c6; padding: 15px 0; position: relative; display: flex; } .hura-cart-drawer-item .hura-cart-drawer-item-image { width: 25%; text-align: center; } .hura-cart-drawer-item .hura-cart-drawer-item-image img { max-width: 100%; } .hura-cart-drawer-item .hura-cart-drawer-item-details { width: 75%; padding-left: 5px; } .hura-cart-drawer-item .hura-cart-drawer-item-title { margin-bottom: 5px; padding: 0; font-weight: 600; } .hura-cart-drawer-item-price { float: right; font-weight: 600; } .hura-cart-drawer-item-view-cart { text-align: center; text-decoration: underline; } .hura-cart-drawer-item-actions { text-align: center; margin: 10px 0; } .hura-cart-drawer-item-checkout { background: #000; color: #fff; padding: 10px 0; border: 0; width: 100%; text-transform: uppercase; } .hura-cart-drawer-item-disable { opacity: 0.5; pointer-events: none; } .hura-cart-drawer-item-credit{ text-align: right; font-size: 75%; margin-top: 20px; width: 100%; } |
hura-cart-drawer.js
For the JavaScript of the cart drawer, copy the following code:
1 2 3 4 5 6 7 8 9 10 11 12 13 14 15 16 17 18 19 20 21 22 23 24 25 26 27 28 29 30 31 32 33 34 35 36 37 38 39 40 41 42 43 44 45 46 47 48 49 50 51 52 53 54 55 56 57 58 59 60 61 62 63 64 65 66 67 68 69 70 71 72 73 74 75 76 77 78 79 80 81 82 83 84 85 86 87 88 89 90 91 92 93 94 95 96 97 98 99 100 101 102 103 | var huraCartDrawer = function () { if (!Element.prototype.closest) { if (!Element.prototype.matches) { Element.prototype.matches = Element.prototype.msMatchesSelector || Element.prototype.webkitMatchesSelector; } Element.prototype.closest = function (s) { var el = this; var ancestor = this; if (!document.documentElement.contains(el)) return null; do { if (ancestor.matches(s)) return ancestor; ancestor = ancestor.parentElement; } while (ancestor !== null); return null; }; } var settings = { speedOpen: 50, speedClose: 350, activeClass: 'is-active', visibleClass: 'is-visible', selectorTarget: '[data-drawer-target]', selectorTrigger: '[data-drawer-trigger]', selectorClose: '[data-drawer-close]', }; var toggleccessibility = function (event) { if (event.getAttribute('aria-expanded') === 'true') { event.setAttribute('aria-expanded', false); } else { event.setAttribute('aria-expanded', true); } }; var openDrawer = function (trigger) { var target = document.getElementById(trigger.getAttribute('aria-controls')); target.classList.add(settings.activeClass); document.documentElement.style.overflow = 'hidden'; toggleccessibility(trigger); setTimeout(function () { target.classList.add(settings.visibleClass); }, settings.speedOpen); }; var closeDrawer = function (event) { var closestParent = event.closest(settings.selectorTarget), childrenTrigger = document.querySelector('[aria-controls="' + closestParent.id + '"'); closestParent.classList.remove(settings.visibleClass); document.documentElement.style.overflow = ''; toggleccessibility(childrenTrigger); setTimeout(function () { closestParent.classList.remove(settings.activeClass); }, settings.speedClose); }; var clickHandler = function (event) { var toggle = event.target, open = toggle.closest(settings.selectorTrigger), close = toggle.closest(settings.selectorClose); if (open) { openDrawer(open); } if (close) { closeDrawer(close); } if (open || close) { event.preventDefault(); } }; var keydownHandler = function (event) { if (event.key === 'Escape' || event.keyCode === 27) { var drawers = document.querySelectorAll(settings.selectorTarget), i; for (i = 0; i < drawers.length; ++i) { if (drawers[i].classList.contains(settings.activeClass)) { closeDrawer(drawers[i]); } } } }; document.addEventListener('click', clickHandler, false); document.addEventListener('keydown', keydownHandler, false); }; huraCartDrawer(); function huraLoadCartDrawer() { fetch('/?sections=hura_cart_drawer').then((resp) => resp.json()).then((data) => { console.log(data.hura_cart_drawer); document.getElementById('cart__drawer').innerHTML = data.hura_cart_drawer; }); } document.addEventListener('click', function (event) { if (event.target.classList.contains('hura-cart-drawer-remove-item')) { event.preventDefault(); var item = event.target.closest('.hura-cart-drawer-item'); if (item) { var productId = item.getAttribute('id'); var productIdArray = productId.match(/\d+/g); if (productIdArray) { var productId = productIdArray[0]; Shopify.removeItem(productId, function (cart) { huraLoadCartDrawer(); }); } } } }); |
- Go to the Sections folder and create a new section file:
hura_cart_drawer.liquidwith the following code:
1 2 3 4 5 6 7 8 9 10 11 12 13 14 15 16 17 18 19 20 21 22 23 24 25 26 27 28 29 30 31 32 33 34 35 36 37 38 39 40 41 42 | <div id="drawer_cart_items" class="cart__drawer_items"> {% if cart.items.size == 0 %} <p style="text-align:center;">Your cart is currently empty.</p> {% else %} <div class="hura-cart-drawer-items"> {% for item in cart.items %} <div class="hura-cart-drawer-item" id="hura-cart-drawer-item-{{ item.id }}"> <div class="hura-cart-drawer-item-image"> <a href="{{ item.url }}" class="hura-cart-drawer-item-image" title="{{ item.title }}"> <img src="{{ item.image | product_img_url: '100x100' }}" alt="{{ item.title }}" width="100" height="100"> </a> </div> <div class="hura-cart-drawer-item-details"> <p class="hura-cart-drawer-item-title"><a href="{{ item.url }}">{{ item.product.title }}</a></p> <div class="hura-cart-drawer-item-option"> {% if item.product.variants.size != 0 %} {% unless item.variant.title contains 'Default' %} <small>{{ item.variant.title }}</small> {% endunless %} {% endif %} </div> <div class="hura-cart-drawer-item-collateral"><strong>{{ item.price | money }}</strong> x {{ item.quantity }}</div> <a href="javascript:void(0)" class="hura-cart-drawer-remove-item">Remove</a> </div> </div> {% endfor %} </div> {% endif %} </div> <div id="drawer__bottom" style="margin-top:10px"> <div class="hura-cart-drawer-item-summary"> <p class="hura-cart-drawer-item-total"> <span class="hura-cart-drawer-item-label">Total:</span> <span class="hura-cart-drawer-item-price">{{ cart.total_price | money }}</span> </p> </div> <div class="hura-cart-drawer-item-actions{% if cart.items.size == 0 %} hura-cart-drawer-item-disable{% endif %}"> <button class="hura-cart-drawer-item-checkout" onclick="window.location='/checkout'">Checkout</button> </div> <p class="hura-cart-drawer-item-view-cart"><a href="/cart">View Cart</a></p> </div> <div class="hura-cart-drawer-item-credit">Powered by <a href="//www.huratips.com" target="_blank">HuraTips.Com</a></div> |
- Go to the Snippets folder and create a new section file:
hura-cart-drawer.liquidwith the following code:
1 2 3 4 5 6 7 8 9 10 | <section class="drawer" id="drawer-name" data-drawer-target> <div class="drawer__overlay" data-drawer-close tabindex="-1"></div> <div class="drawer__wrapper"> <div class="drawer__header"> <div class="drawer__title"><strong>My Cart</strong></div> <button class="drawer__close" data-drawer-close aria-label="Close Drawer"></button> </div> <div class="drawer__content" id="cart__drawer">{% section 'hura_cart_drawer' %}</div> </div> </section> |
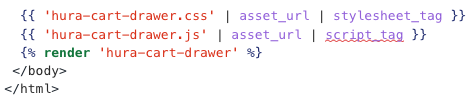
- Go to the Layouts folder, open the
theme.liquidfile and paste the provided snippet after all other code, before the closing</body>tag
1 2 3 | {{ 'hura-cart-drawer.css' | asset_url | stylesheet_tag }} {{ 'hura-cart-drawer.js' | asset_url | script_tag }} {% render 'hura-cart-drawer' %} |
Finally! Now, the last thing that we need to do is to customize the link to the cart to trigger the cart drawer.
Let’s find the anchor tags (<a></a>) that link to the cart page. Those anchor tags should use either of the following href attribute values: {{ routes.cart_url }} or /cart. Once you have found it, replace the value of href the attribute with javascript:void(0)
Then, you’ll apply the following attributes to this anchor tag.
1 | data-drawer-trigger aria-controls="drawer-name" aria-expanded="false" |
It should look like this now:
1 2 3 4 | <a href="javascript:void(0)" data-drawer-trigger aria-controls="drawer-name" aria-expanded="false"> <i class="fa fa-shopping-cart"></i> <span class="cart-total-items hidden-xs"><span class="count">{{ cart.item_count }}</span> </span> </a> |

Save the files and you’re done. Now, you can display or hide the cart drawer whenever you click the shopping bag button.

Conclusion
In the fast-paced world of e-commerce, every detail matters. Your customers demand a seamless, intuitive, and aesthetically pleasing shopping experience, and the cart drawer is a significant part of that experience. While there are many Shopify apps available to create a cart drawer, taking the manual approach empowers you to fully customize it to match your brand and customer expectations.
By following the steps outlined in this guide, you can create a cart drawer that seamlessly integrates with your Shopify store, enhancing both functionality and aesthetics. Remember to keep user-friendliness, responsiveness, and branding in mind throughout the design and implementation process.
In conclusion, mastering the art of creating a cart drawer manually in Shopify allows you to stand out in a crowded marketplace and provide your customers with a shopping experience they won’t forget. As you implement this knowledge, you’ll be well on your way to creating a more engaging and memorable shopping journey for your online store’s visitors.