How to Start a Dropshipping Business on Shopify

Shopify is arguably one of the best platforms for dropshipping. But, how does it work? If you do not know, there’s no need to worry. We’ll cover everything you need to know to get started.
But first, you’ll need some background info.
What is dropshipping?
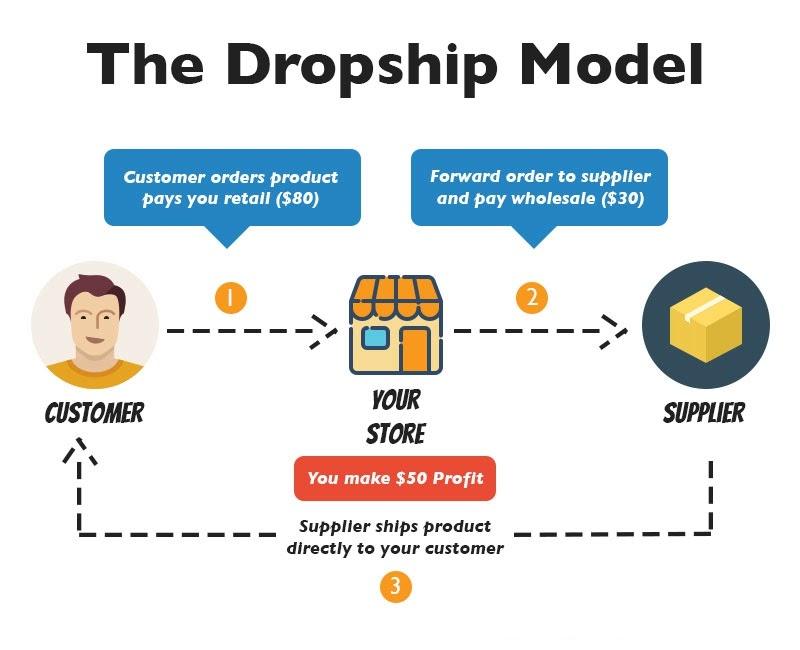
Dropshipping is an eCommerce model that enables vendors to sell products online without holding inventory. When the dropshipping store sells a product, it buys the item from a third party and has that entity deliver directly to the customer.
It comes with the benefit of being a lot less risky, as it enables business owners to try new product ideas and product lines without the need to purchase large amounts of stock. Since it has few barriers to entry, it also allows aspiring entrepreneurs to enter the eCommerce industry.
What is Shopify?
Shopify is a subscription-based software that allows anyone to set up an online store and sell their products. The platform offers all the free tools you need to quickly launch your dream business and start selling products to your customers – wherever they may be. Whether you need to get a simple store operational as soon as possible or prefer to custom-build a unique shopping experience, Shopify is versatile enough to meet your needs.
Why use Shopify for dropshipping?
Ecommerce vendors need to display products, interact with customers, process payments, fulfill orders, and manage their finances and operations. You could do this using individual tools, but it would cost an enormous amount of time and money to get these systems to work together. Shopify offers a fully integrated platform with all the business tools you need.
How to get started dropshipping?
1. Choose a business name
Naming your dropshipping store is the first step towards a successful brand. The best names are simple, memorable, and creative. There are several business name generators online that you can use for ideas. All you need to do is provide a word that you want your business name to be based on, then you will receive a list of suggestions. The exact procedure for this process may vary slightly from one service to another, but it largely remains the same. That’s all there is to it.
After you’ve got ideas for a store name, you’ll need to check to see if any of them are available. If your business name idea was something like “best American computers”.
Try doing a Google search on it. The results include “bestamericancomputers” with the suffix “.com”, which’s already been claimed by someone. You’ll likely need to come up with a new idea.
2. Create a Shopify account

Creating a Shopify account is a straightforward process. First, go to the Shopify homepage. Once it has loaded, you should see an empty bar at the center of your screen for your email address.
Provide your email address. You will then be requested to enter a password for your account, along with a name for your Shopify store. Once this has been done, you will need to fill a form with questions about your knowledge of eCommerce.

Your Shopify account will be activated once you finish these steps.
3. Optimize your settings
Okay – you have successfully launched your Shopify store, but there’s more to do. Now you need to modify your Shopify account settings. This will enable you to process customer payments, create store policies, and set shipping rates.
Payment details
The first thing you will need to do is add payment information to your Shopify store. This is a crucial step since you won’t be able to receive money until you complete it.
You’ll be asked to provide payment details during the account setup process. You can also edit them by going to the Shopify settings page. Once you’re there, click the payments tab to the left of your screen, then add payment information.
It’s usually advised that you add a PayPal account. The setup process takes only a few minutes if you don’t have one.
Store policies
Your store policies must align with and reinforce your business setup. Shopify has a helpful automated tool that will generate standardized refund policies, privacy policies, and terms and conditions for your store. You may find this tool in settings.
You will find your privacy policies at the bottom of your store’s checkout page. Simply click the checkout tab and scroll down to the bottom to find the policy fields.
Your dropshipping store must have precise shipping rates. It is often advised that you offer free shipping, as it is the approach most successful at bringing in new customers. Besides, it will be difficult to handle different shipping rates for various regions. Offering free shipping, then incorporating its costs into the product price is a much easier option. For instance, if you’re planning on selling a laptop at $800, raise the price to $815, then offer free shipping. You can activate free shipping by visiting the shipping tab in your Shopify store settings.
Remove all the domestic shipping zones and add free international shipping to the rest of the world section. Now, all you have to do is choose “Rate: free shipping rate”, and everything should be set.
4. Launch your new dropshipping brand
To launch your store, go to the “Sales Channels” option in your Shopify settings. From here, choose “Add an online store”. Your store will go live once you do this.
Theming and design
This section of our guide deals with the design essentials for your store, along with important considerations for you. The store design is an integral part of your business as it affects how you present your store and brand. It gives visitors a first impression of your business which will contribute to their decision to buy from you.
There are two significant design considerations for your store; your logo and theme.
Creating a logo
Your logo helps customers remember your brand. You will want to put thought into how you want it to look, how it will fit with the rest of your store’s design.
Creating a professional logo isn’t easy, but there are free online tools you can use. All you need to do is experiment with colors, fonts, layouts, and you will have an excellent logo for your shop.
If you have design experience and would instead make your logo from scratch, you may consider pro tools like Logo Maker tool from Shopify.
Themes
Shopify has an integrated theme store that you can download various templates from. There are both free and paid options. Look through them and choose what’s best for you. If you’re starting with a tight budget, you may go with a free Shopify theme.
5. Install a dropshipping app
Your dropshipping app will give you access to a database of products you can dropship, enable you to import them to your website and help you manage orders.
There are many Shopify dropshipping apps on Shopify App Store to choose from.
6. Start selling
Now you can start generating sales and making money from your store. You probably won’t get much traffic by simply launching your store, so you should use marketing strategies like pay-per-click advertising and content marketing to win customers.
Source: WholeSale2B