How to Improve Speed Up Image Loading on Your Shopify Store

When it comes to selling online, there are a few key factors that can have a big impact on your store’s conversion rate. One of these key factors is web page speed loading. And the length of time it takes for images to load is one of the primary reasons why your website is so sluggish. In this blog article, we will demonstrate how you may use some straightforward recommendations to expedite the loading of images on your Shopify site. Let’s get started!
The following is a list of numerous different methods that may assist you in optimizing images:
1. Don’t retrieve images of excessively high resolution
Although image size isn’t directly related to one of the key components of a performance score, it may significantly affect a website’s performance if photos aren’t generated at the proper size.
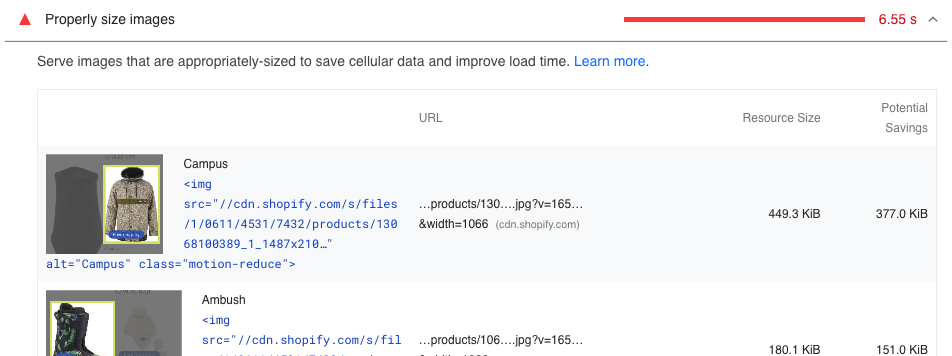
For illustration purposes, below is the code that displays your image:
1 | <img src="{{ product.featured_media | image_url: width: 1024 }}"> |
If you run the above code, you’ll get an image with a width be 1024px. This is a size indicative of a huge image so the size of the data being represented is likewise rather large. You have the option of changing this size to a lesser number. This results in a size reduction that is rather noticeable.
1 | <img src="{{ product.featured_media | image_url: width: 800 }}"> |
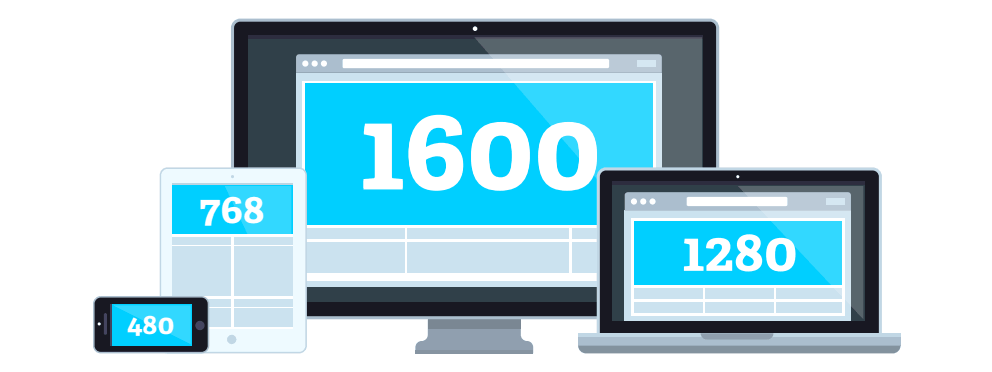
2. Show proper-size images for the device it is being viewed on
The src-set and sizes method help shows an image in a manner that is appropriate for the device it is being viewed on. Take, for instance, the banner above the homepage or the primary product picture. The src-set and sizes properties provide you the ability to specify in much more depth and with greater control what picture should be shown at various viewport widths.
As a result, in order to accommodate the responsive nature of the storefront and the various sizes in which your product images may be rendered, let’s provide the browser with a variety of image sizes and rules for how to output these images.
To begin, I will provide you src-set with the primary product picture, which is as follows:
1 2 3 4 5 6 7 | srcset="{%- if product.featured_media.width >= 165 -%}{{ product.featured_media | image_url: width: 165 }} 165w,{%- endif -%} {%- if product.featured_media.width >= 360 -%}{{ product.featured_media | image_url: width: 360 }} 360w,{%- endif -%} {%- if product.featured_media.width >= 533 -%}{{ product.featured_media | image_url: width: 533 }} 533w,{%- endif -%} {%- if product.featured_media.width >= 720 -%}{{ product.featured_media | image_url: width: 720 }} 720w,{%- endif -%} {%- if product.featured_media.width >= 940 -%}{{ product.featured_media | image_url: width: 940 }} 940w,{%- endif -%} {%- if product.featured_media.width >= 1066 -%}{{ product.featured_media | image_url: width: 1066 }} 1066w,{%- endif -%} {{ product.featured_media | image_url }} {{ product.featured_media.width }}w" |
This gives the browser access to a series of photos and gives it information about the sizes of those images.
The next step is to provide some recommendations to the browser on the appropriate picture size to use and when to use it.
1 | sizes="(min-width: {{ settings.page_width }}px) {{ settings.page_width | minus: 130 | divided_by: 4 }}px, (min-width: 990px) calc((100vw - 130px) / 4), (min-width: 750px) calc((100vw - 120px) / 3), calc((100vw - 35px) / 2)" |
{{ settings.page_width }} is a global parameter, which controls the maximum page width for desktop devices. Using a combination of this setting’s value and some math applied to the Viewport Width (vw) value you are able to provide the optimum image size for different viewports.
3. Use lazy loading to improve the image loading speed
Google Lighthouse also identified an opportunity to defer the offscreen images. Normally, all of the images will be loaded, regardless of whether or not the user can see them in their viewport.
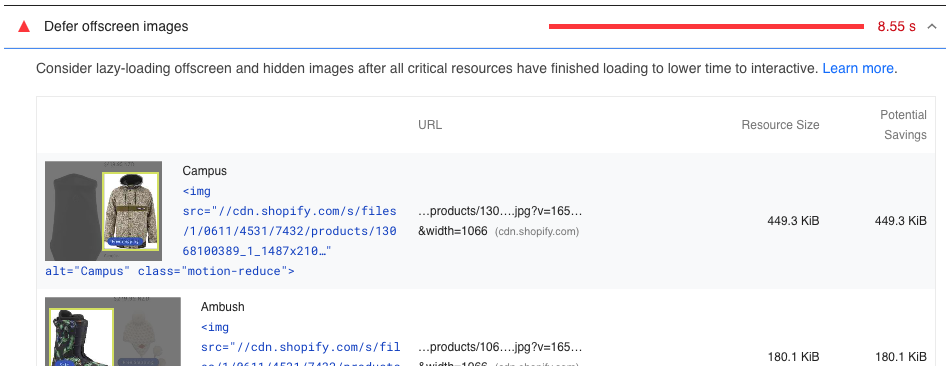
This functionality is already automatically supported by Shopify; all you need to do is add the loading="lazy" attribute to any image tags on your site.
1 | <img src="{{ product.featured_media | image_url: width: 1024 }}" loading="lazy"> |
Read more: How to easily add lazy loading for images in Shopify, The best Shopify Lazy Load apps to make your online store faster.
Cumulative Layout Shift (CLS) measures the greatest bursts of all unexpected layout alterations that take place over the course of a page’s lifetime. A layout shift happens whenever a visible element moves from one displayed frame to the next. While loading material into the website via JavaScript is a common source of this, pictures loaded without the proper size attributes set may also be the culprit.
The disadvantage of the lazy-load technique you just used for your photos is that it may also have an influence on the Cumulative Layout Shift (CLS), even though material loaded through JavaScript is the main cause of low CLS scores. You may provide width and height properties to the image in order to inform the browser how much room to allocate for these images and to reduce the possibility of CLS, which might occur while an image is being loaded.
To take use of this advice, apply the code shown in the following paragraph to the image tags:
1 2 | width="{{ product.featured_media.width }}" height="{{ product.featured_media.height }}" |
Conclusion
I demonstrated how you may use some straightforward recommendations to expedite the loading of images on your Shopify site. After reading this article, I hope that you will be able to optimize the speed of your website and understand how to improve the time it takes to load images. Still, have questions? Let me hear them in the comments!